@gastrovinos: Responder a @c_sarleon22 respondiendo a la comunidad #EscuelaTikTok #AprendeEnTikTok #catando #YoSoyCreador #LibreDeSer

Juan Carlos Vega
Juan Carlos Vega
Open In TikTok:
Region: MX
Sunday 06 June 2021 01:03:09 GMT
130732
7472
112
13

Music

Download

Comments

narbuj
narbuj :
Las opiniones son subjetivas^^
2021-06-06 01:18:14
197
diegogmgar
Diego GM :
Si que respuesta correcta no todos tenemos los mismos gustos
2021-06-06 01:55:19
77
jairoalonso1978
C0N7R3RA5⚓🇨🇴 :
SUBJETIVOS
2021-06-06 02:41:30
13
aka_4loko.wav
FxurLoko :
que tal Soy nuevo seguidor cata kosako y/o fourloko
2021-06-06 03:07:21
11
omar_cast_
Omar Cast :
a mi le gustaría saber cueles vinos son buenos acompañamientos para cuales platillos
2021-06-06 03:09:24
9
miguelpadilla443
Miguel Padilla :
así es en pocas palabras solo estás dando una reseña del vino o licor...por cierto ni tomo jajjaaj
2021-06-06 03:32:47
6
talitocuervo86
🏆👑LORD KING👑🏆 :
ERES MUY ÉTICO Y PROFESIONAL UN GRAN SALUDO AMIGO
2021-06-06 02:30:16
5
karlagustav
Karla Gustav :
subjetivo
2021-06-06 02:06:48
5
To see more videos from user @gastrovinos, please go to the Tikwm homepage.

Other Videos

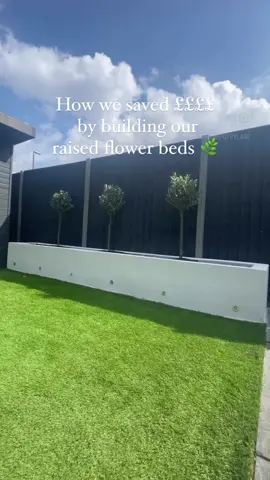
How we saved hundreds by building our own raised flower bed… Day 1 Bed measurements- Length 370cm x depth 55cm x 45cm height  You will need; 12x Building Sand  3x Cement  (4 Sand to 1 cement)  Water Trowel 34x concrete blocks  String Spirit level Mixing bucket  *Prepare the ground with compacted type 1, alternatively you could lay a cement base. Lay out the breeze blocks to get an idea of order for corners etc. *Mix the cement (4 sand to 1 cement) and slowly add water. *Tip* I mixed this by hand but I would advise to either hire a cement mixer or cement mixing tool as it ends up being very tiring!  *Apply the cement to the base and lay the bricks, you need the cement to be creamy and easy to move around. Line up your stretched string from one end to another to make sure you’re going straight.  *Tip* Make sure you check every angle of the brick with a spirit level, you will have a good hour to be able to move around and adjust bricks so take your time! Day 2- Rendering You will need; Rendering bead Fibre glass rendering mesh  White K rend (we used 5) Water  Mixing bucket Rendering trowel Scratching float  When the cement has completely set your ready to render, we allowed a couple of days in-between. Screw the rendering bead onto every edge and corner. Mix up your K rend *Tip* add the powder and water slowly to build up Apply the fibre glass rendering mesh (stick this on with patches of k rend) this allows the K rend to stick to the bricks. Apply the K rend with the rendering trowel. We didn’t use an under coat so we applied 2 layers of this. Try and get it smooth and level as possible then leave to dry for a good 24 hours. When fully dry use the scratching float and scratch down every surface, this needs to be done in a light circular motion and smooth out any lumps and bumpy areas. *Tip* wear a face mask and protective glasses for this part as it’s quite messy!  Once you have scratched the full wall you’re ready to add lights, I used decking lights which we drilled into the base of the wall. #homerenovations #homedecorprojects #renovationideas  #g#gardenlightso#olivetreesr#raisedbedr#raisedplanterm#moderngardenl#landscapedesigng#gardenlightingg#gardenfurnitureg#gardenmakeoverg#gardenideasgarden
How we saved hundreds by building our own raised flower bed… Day 1 Bed measurements- Length 370cm x depth 55cm x 45cm height  You will need; 12x Building Sand  3x Cement  (4 Sand to 1 cement)  Water Trowel 34x concrete blocks  String Spirit level Mixing bucket  *Prepare the ground with compacted type 1, alternatively you could lay a cement base. Lay out the breeze blocks to get an idea of order for corners etc. *Mix the cement (4 sand to 1 cement) and slowly add water. *Tip* I mixed this by hand but I would advise to either hire a cement mixer or cement mixing tool as it ends up being very tiring!  *Apply the cement to the base and lay the bricks, you need the cement to be creamy and easy to move around. Line up your stretched string from one end to another to make sure you’re going straight.  *Tip* Make sure you check every angle of the brick with a spirit level, you will have a good hour to be able to move around and adjust bricks so take your time! Day 2- Rendering You will need; Rendering bead Fibre glass rendering mesh  White K rend (we used 5) Water  Mixing bucket Rendering trowel Scratching float  When the cement has completely set your ready to render, we allowed a couple of days in-between. Screw the rendering bead onto every edge and corner. Mix up your K rend *Tip* add the powder and water slowly to build up Apply the fibre glass rendering mesh (stick this on with patches of k rend) this allows the K rend to stick to the bricks. Apply the K rend with the rendering trowel. We didn’t use an under coat so we applied 2 layers of this. Try and get it smooth and level as possible then leave to dry for a good 24 hours. When fully dry use the scratching float and scratch down every surface, this needs to be done in a light circular motion and smooth out any lumps and bumpy areas. *Tip* wear a face mask and protective glasses for this part as it’s quite messy!  Once you have scratched the full wall you’re ready to add lights, I used decking lights which we drilled into the base of the wall. #homerenovations #homedecorprojects #renovationideas #g#gardenlightso#olivetreesr#raisedbedr#raisedplanterm#moderngardenl#landscapedesigng#gardenlightingg#gardenfurnitureg#gardenmakeoverg#gardenideasgarden

About