@squarecircle3d: Seni Pencak silat Cimande terinspirasi dari abah guru @purnama1960 #silat#animasi #animasiindonesia #blender #b3d #squarecircle #karyabangsa #pencaksilat #cimande

Square Circle
Square Circle
Open In TikTok:
Region: ID
Wednesday 09 October 2024 08:20:03 GMT
331945
12779
196
337

Music

Download

Comments

telskp
yu :
ini animasi bikin sendiri mang?
2024-10-09 08:41:58
20
yodikjulisty
PonorogoWifi Cabang Menang :
smooth
2024-11-05 03:44:31
0
asdfghjklqwerty.24
Sehat Di? :
Keep it up 🔥
2024-10-12 12:36:27
0
ilhamkalsel_1
ilhamm :
cloth simulation 🔥
2024-10-18 09:00:41
0
rendi_24376
Ren. :
lebih seru nonton pencak silat seni, daripada pencak silat yang gelut 😹
2024-10-16 20:38:05
15
user3043788184672
Raden Ahmad :
bikin lagi mas..salam dari Malaysia..pencak cimande mantep
2024-11-13 11:29:24
7
abimanyorn
AbimanyOrn :
keren mang, gila gak tau kalau animator lokal udah sebagus ini
2024-10-12 10:06:08
11
fansyud
fanyuds :
cita-citaku pengen buat animasi tentang nusantara Indonesia😁, mudah mudahan bisa kayak kakaknya
2024-10-09 12:59:35
6
To see more videos from user @squarecircle3d, please go to the Tikwm homepage.

Other Videos

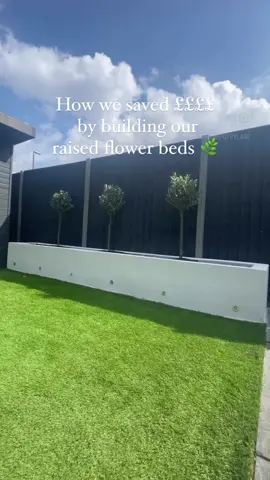
How we saved hundreds by building our own raised flower bed… Day 1 Bed measurements- Length 370cm x depth 55cm x 45cm height  You will need; 12x Building Sand  3x Cement  (4 Sand to 1 cement)  Water Trowel 34x concrete blocks  String Spirit level Mixing bucket  *Prepare the ground with compacted type 1, alternatively you could lay a cement base. Lay out the breeze blocks to get an idea of order for corners etc. *Mix the cement (4 sand to 1 cement) and slowly add water. *Tip* I mixed this by hand but I would advise to either hire a cement mixer or cement mixing tool as it ends up being very tiring!  *Apply the cement to the base and lay the bricks, you need the cement to be creamy and easy to move around. Line up your stretched string from one end to another to make sure you’re going straight.  *Tip* Make sure you check every angle of the brick with a spirit level, you will have a good hour to be able to move around and adjust bricks so take your time! Day 2- Rendering You will need; Rendering bead Fibre glass rendering mesh  White K rend (we used 5) Water  Mixing bucket Rendering trowel Scratching float  When the cement has completely set your ready to render, we allowed a couple of days in-between. Screw the rendering bead onto every edge and corner. Mix up your K rend *Tip* add the powder and water slowly to build up Apply the fibre glass rendering mesh (stick this on with patches of k rend) this allows the K rend to stick to the bricks. Apply the K rend with the rendering trowel. We didn’t use an under coat so we applied 2 layers of this. Try and get it smooth and level as possible then leave to dry for a good 24 hours. When fully dry use the scratching float and scratch down every surface, this needs to be done in a light circular motion and smooth out any lumps and bumpy areas. *Tip* wear a face mask and protective glasses for this part as it’s quite messy!  Once you have scratched the full wall you’re ready to add lights, I used decking lights which we drilled into the base of the wall. #homerenovations #homedecorprojects #renovationideas  #g#gardenlightso#olivetreesr#raisedbedr#raisedplanterm#moderngardenl#landscapedesigng#gardenlightingg#gardenfurnitureg#gardenmakeoverg#gardenideasgarden
How we saved hundreds by building our own raised flower bed… Day 1 Bed measurements- Length 370cm x depth 55cm x 45cm height  You will need; 12x Building Sand  3x Cement  (4 Sand to 1 cement)  Water Trowel 34x concrete blocks  String Spirit level Mixing bucket  *Prepare the ground with compacted type 1, alternatively you could lay a cement base. Lay out the breeze blocks to get an idea of order for corners etc. *Mix the cement (4 sand to 1 cement) and slowly add water. *Tip* I mixed this by hand but I would advise to either hire a cement mixer or cement mixing tool as it ends up being very tiring!  *Apply the cement to the base and lay the bricks, you need the cement to be creamy and easy to move around. Line up your stretched string from one end to another to make sure you’re going straight.  *Tip* Make sure you check every angle of the brick with a spirit level, you will have a good hour to be able to move around and adjust bricks so take your time! Day 2- Rendering You will need; Rendering bead Fibre glass rendering mesh  White K rend (we used 5) Water  Mixing bucket Rendering trowel Scratching float  When the cement has completely set your ready to render, we allowed a couple of days in-between. Screw the rendering bead onto every edge and corner. Mix up your K rend *Tip* add the powder and water slowly to build up Apply the fibre glass rendering mesh (stick this on with patches of k rend) this allows the K rend to stick to the bricks. Apply the K rend with the rendering trowel. We didn’t use an under coat so we applied 2 layers of this. Try and get it smooth and level as possible then leave to dry for a good 24 hours. When fully dry use the scratching float and scratch down every surface, this needs to be done in a light circular motion and smooth out any lumps and bumpy areas. *Tip* wear a face mask and protective glasses for this part as it’s quite messy!  Once you have scratched the full wall you’re ready to add lights, I used decking lights which we drilled into the base of the wall. #homerenovations #homedecorprojects #renovationideas #g#gardenlightso#olivetreesr#raisedbedr#raisedplanterm#moderngardenl#landscapedesigng#gardenlightingg#gardenfurnitureg#gardenmakeoverg#gardenideasgarden

About